
BOO!!! It’s that spooky time of year again. Halloween is around the corner y’all! Have you started planning your Halloween decorations and treats? This year, I am focusing on my chocolate-work skills. I am making tempered chocolate Halloween decorations to add onto the top of my baked goodies! Though we cannot have any friends over for Halloween this year (keeping up with that 2020 social distancing), we can still drop off these cute desserts on the porches of our friends.
In years past, we made drunken candy apples and spooky window porch silhouettes. For this blog post, we will share everything we learned about the chocolate tempering process, as well as our free printable tracing guides to make the spookiest and cutest decorations for your halloween treats.
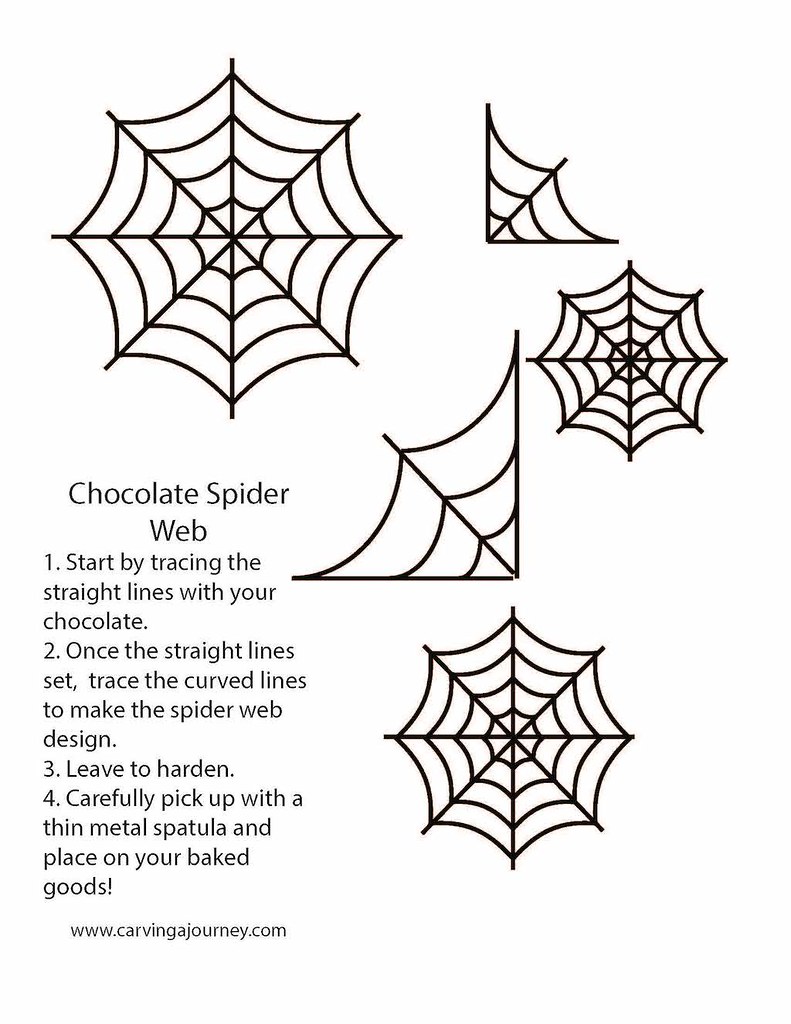
Our free printable guide for tracing our Halloween treats & decorations is available at the bottom of this post!!!
Pro Tip: When working with chocolate, do not wear any clothes you love and do not wear white. You WILL get chocolate on you, even if you are wearing an apron. I have learned and RELEARNED this many, many times.
Why Temper Chocolate?
Any manufactured chocolate (a.k.a. Chocolate you buy as an ingredient for baking or cooking) should be tempered before use when dipping, pipping, or molding. This is done for three very crucial reasons:
- Tempering gives the chocolate the beautiful glossy appearance. When the chocolate isn’t tempered, the color can have a very dull and matted look (not a very appetizing look, ehh?).
- The chocolates will be easier to handle and work-with as a solid when properly tempered. Otherwise, the chocolate will melt more quickly and break apart more easily when handled.
- Tempering chocolate creates that ‘snap’ when breaking it apart or biting into it. The chocolate will be soft to bite into when it is not tempered properly.
Is Tempering the Same for Different Types of Chocolate?
No! Different types of chocolate (dark, semi sweet, bittersweet, milk, white) have different temperatures necessary to temper properly. To get more scientific: tempering chocolate helps to form beta crystals in the cocoa butter. This type of crystal is what makes the chocolate shiny and durable, and allows the chocolate to snap. There are different amounts of sugars and cocoa butter in the different types of chocolate. For this reason, the temperatures vary slightly when tempering.

The temperature range for perfectly tempered chocolate is very narrow. Temper is formed at these temperatures:
- Dark and Bittersweet Chocolate: Tempering occurs between 88°F-90°F. The target temperature is 89°F.
- Milk Chocolate: Tempering occurs between 86°F-88°F. The target temperature is 87°F.
- White Chocolate: Tempering occurs between 86°F-88°F. The target temperature is 87°F.
Tempering will not work unless you are using the exact and correct temperatures. Check your type of chocolate before starting.
Tools for Tempering Chocolate:
When prepping your tools, you should make sure all your equipment is perfectly clean and dry. If not clean, particles can get into your chocolate work. If not dry, water will cause the oils in your chocolate to separate from the sugary solids.
Below is a List of Tools Necessary for Tempering Chocolate:
- Cutting Board (Omit if using chocolate wafers, morsels, etc. Needed for blocks of chocolate.)
- Short-Blade Knife (Omit if using chocolate wafers, morsels, etc. Needed for blocks of chocolate.)
- Double Boiler
- Rubber Spatula
- Thermometer
- Parchment or Waxed Paper
- Baking Trays
- Piping Bags or Squeeze Bottles
- Our Printable Halloween Tracing Guides
Below is a List of Ingredients for Making Our Tempered Chocolate Halloween Treats & Decorations:
- Milk, Semi Sweet, or Dark Chocolate
- White Chocolate
- M&M’s
- Water
Introducing Our Tempered Chocolate Halloween Treats & Decorations
Now that we have learned about tempering chocolate, let’s get into our designs! Some designs are super simple and do not need instructions. Other designs have our free tracing instructions and graphics! If you download the pack, we would love it if you subscribed to our mailing list!!! We would love the support!
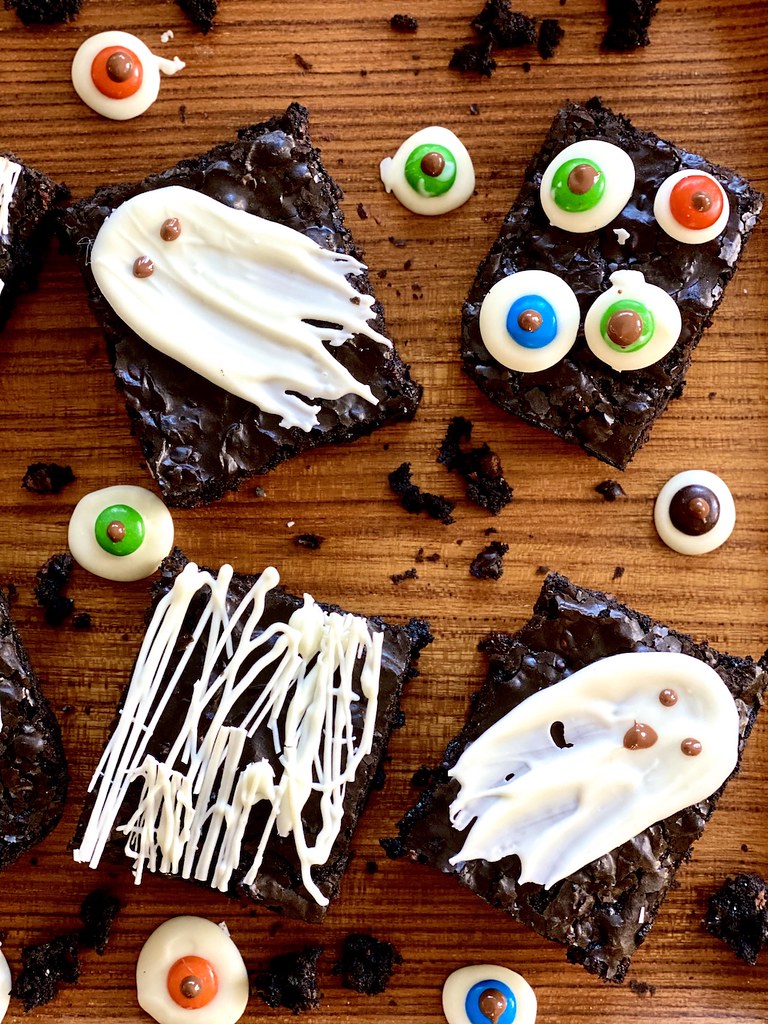
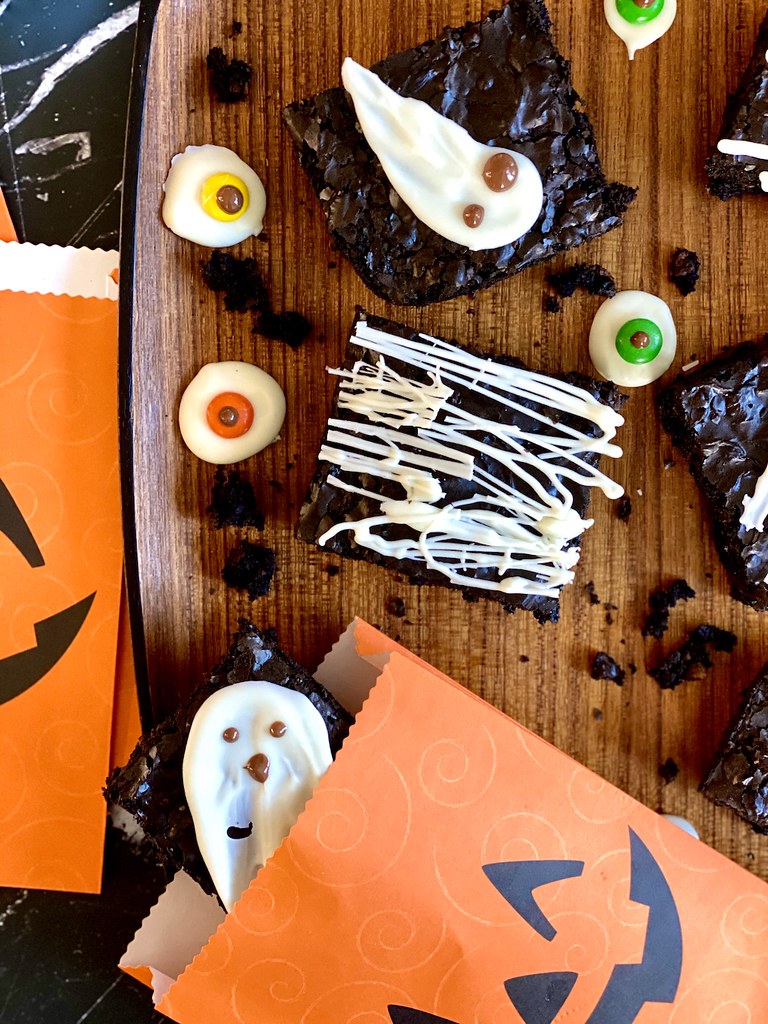
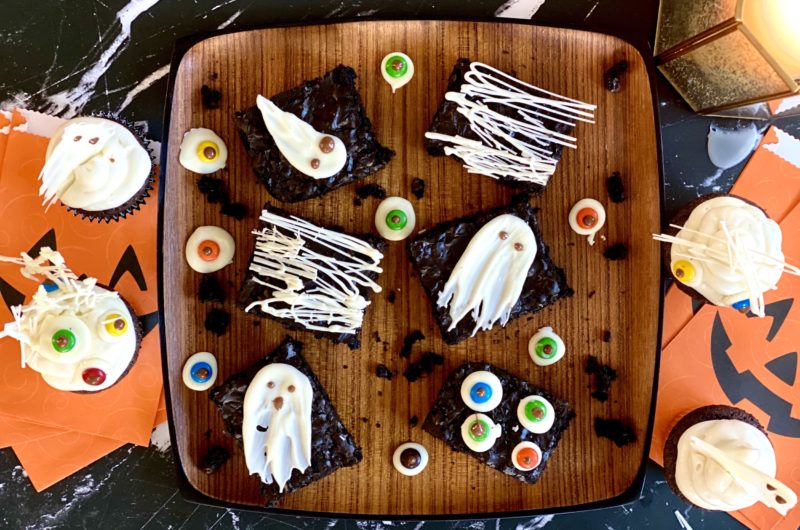
1. Chocolate Ghost
Our chocolate ghost does not need a tracing graphic attached because it is so easy! First spoon your choice of tempered chocolate onto your parchment paper. Then, with the back of the spoon, swip the chocolate to spread it out into a ghost-like fashion. Easy, quick, and simple!
To create eyes, simply use another type of chocolate OR mini chocolate chips.

2. Chocolate Monster and Spooked Eyes
Chocolate monster eyes are also extremely easy. Simply put a little dot of white chocolate on the parchment paper. Then, add M&M’s onto the white chocolate and leave it to harden. Make sure to put the ‘M’ side down onto the white chocolate. After it cools, put a dot of milk or dark chocolate on top of the M&M.
The spooked ‘scared’ eyes begin to test your skills. First, start by creating an oval of white chocolate. Once the white chocolate cools, add a new, smaller oval of milk or dark chocolate overtop the larger oval of white chocolate. Then, let it cool. Finally, add an even smaller oval of white chocolate perpendicular to the dark chocolate. This is the ‘gleam’ in the scared, spooked eyes.

3. Spider Webs
Using our chocolate tracing graphics, simply trace over the graphics with your tempered chocolate. Do one line at a time, and let it harden. This can be a bit difficult, because the chocolate tends to continue to leak out of the piping bag.
4. Mummy Cloth
Making what looks similar to a mummy’s cloth is extremely easy and child friendly! Quickly move the piping bag back and forth allowing a steady, light stream to come out. You are really just flicking the chocolate back and forth. This will create a random, crisscrossed look. You can see in the image below. Simply let it harden, break pieces off, and onto your baked goods as decorations. I chose not to add eyes, but if you do, you will have the cutest “mummy” look!
I actually have the most fun doing this. It makes a total mess but brings a lot of laughter as you splash the chocolate onto the parchment paper. I highly recommend doing this with kids!
5. Chocolate Bat
Finally, creating the chocolate bat. Simply trace our graphic for the bats and let the chocolate harden. Fill in if you would like a solid piece of chocolate.

Alternatives to Tempering Chocolate:
Personally, I enjoy the process of melting and tempering chocolate. However, I understand many do not have the time, patience, or desire to go through the entire tempering process. Hey, sometimes I want to skip steps when cooking or baking as well.
Below are some alternatives to tempering chocolate.
Candy Melts:
Candy melts are a chocolate substitute made out of sugar, milk solids (powdered milk), vegetable oils, flavorings and colors. Usually, there isn’t any actual chocolate in candy melts, though cocoa powder is sometimes an added ingredient.
Candy melts have palm oil and other vegetable oils which have a higher melting temperature than the cocoa butter in chocolate. This allows the candy melts to be less likely to break and leach fat after hardening.
NOTE: If you have allergies, pay attention to the ingredients of candy melts. Most contain at least one of the major allergens (soy) and are often manufactured on the same equipment as others (gluten/nuts/etc.)
Candy Melts Pros:
- Once hardened, candy melts do not melt as easily as chocolate. This means your decorations won’t melt nearly as quickly/easily when handling them.
- There is no need to temper candy melts. While chocolate needs to be tempered to create a shiny, well structured coating, candy melts have good structure without being tempered.
Candy Melts Cons:
- Candy melts do not contain any chocolate and are rather unhealthy. Though they look like chocolate, candy melts are highly manufactured and contain artificial flavors and oils to produce a similar texture and flavor.
Doodling and Coloring Your Halloween Treats:
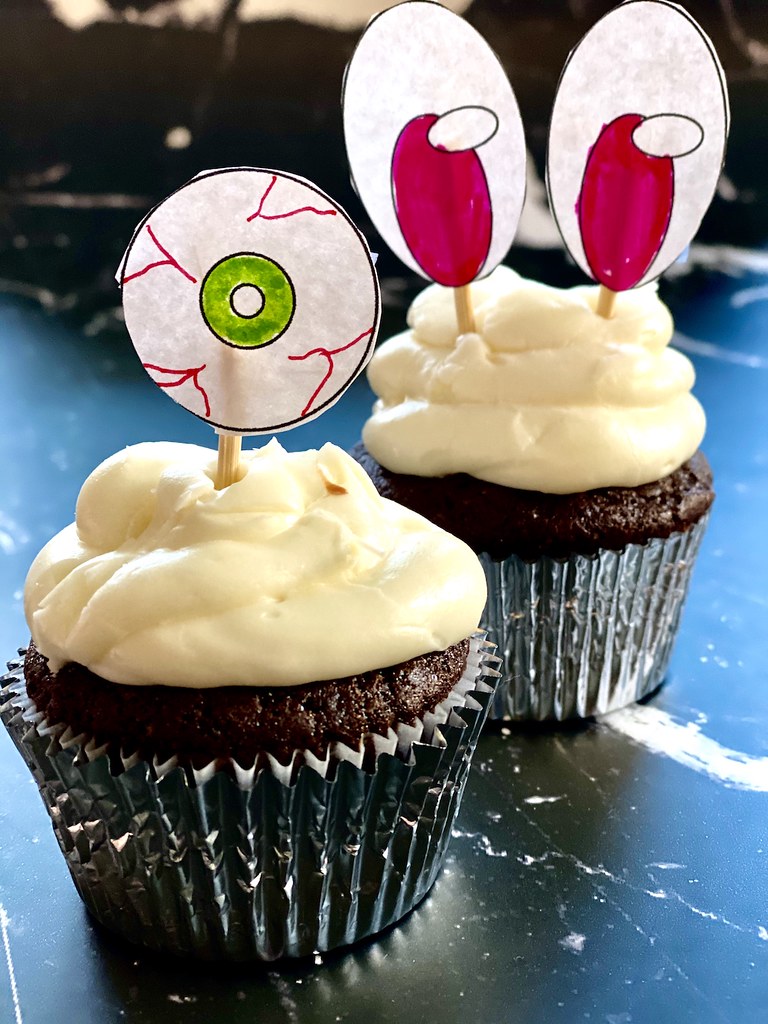
When decorating for Halloween with kids, sometimes skipping sugary is the goal and an art project is necessary. Instead, have your toddlers color in our free halloween tracing guides with crayons and/or markers. Afterward, cut out the doodles, attach to skewers or toothpicks, and stick into your baked goods!
Doodling Pros:
- Cute little doodles from your children.
- Fun little halloween party activity.
- No mess!
Doodling Cons:
- Unfortunately, these cute drawings are not edible!!!
Below are our templates for making these cute Halloween decorations. We hope you enjoy our tempered chocolate Halloween treats! If you download our guides, we would truly appreciate if you would subscribe to our blog for further content! You can subscribe by filling out the subscribe box on the right-hand side of our blog!
Have you ever tempered chocolate before? If so, please let us know your tricks for making tempered treats in the comments below. After all, we are still learning!
We hope you enjoy our Halloween treat tracing guides! Finally, if you are looking for further Halloween/Fall posts:
- Drunken/Alcoholic Candy Apples
- Spooky Halloween Window Silhouettes
- Our Guide to Picking Your Perfect Pumpkin (Baking, Cooking, and Decorating)
- 10 Things to Try This Fall
- How to Freeze Apples Quickly and Easily (After Apple Picking)
You can follow us at @carvingajourney on Instagram, Twitter, Facebook, and Pinterest.
)
Tempered Chocolate (Halloween Treats & Decorations Post)
10
minutes30
minutesIngredients
Your (white, dark, semi sweet…) chocolate. Add any amount you need to make your desserts!
Water
Directions
- If using blocks of chocolate, use a knife and cutting board to break the chocolate into small pieces. If you are using melting chocolate wafers, skip this step.
- Using a double boiler, heat a thin layer of water in the bottom pot to about 130°F. The water should not be able to touch the upper pot.
- Add in your preferred type of chocolate (and the amount you need) to the top pot of the double boiler.
- Using a rubber spatula, stir the chocolate continually in a gentle motion until about 2/3 of the chunks become liquid and about 1/3 are soft little pieces.
- At this point, the temperature of the chocolate should be about 95°F.
- Take the top pot off of the double boiler and continue to stir. The stirring allows the clumps of soft chocolate to disappear and lets the temperature lower to the appropriate temperature for tempering (89°F for dark or bittersweet chocolate, 87°F for milk or white chocolate.)
- Finally, at this point, the chocolate should be tempered!
Did you make this recipe?
Tag @carvingajourney on Instagram and hashtag it
Like this recipe?
Follow us @carvingajourney on Pinterest
Did you make this recipe?
Follow Carving A Journey on Facebook
Carving A Journey is a participant in the Amazon Services LLC Associates Program, an affiliate advertising program designed to provide a means for sites to earn advertising fees by advertising and linking to Amazon.com. Although we may earn commissions for our endorsement, recommendation, testimonial, and/or link to any products or services from this website, these opinions are my own and I fully support these products.
2 comments
Such fun-thanks.
YOU ARE SO TALENTED these are so cute! Like Food Network-worthy!!!